You can also view a turntable animation of this model on Bluesky.
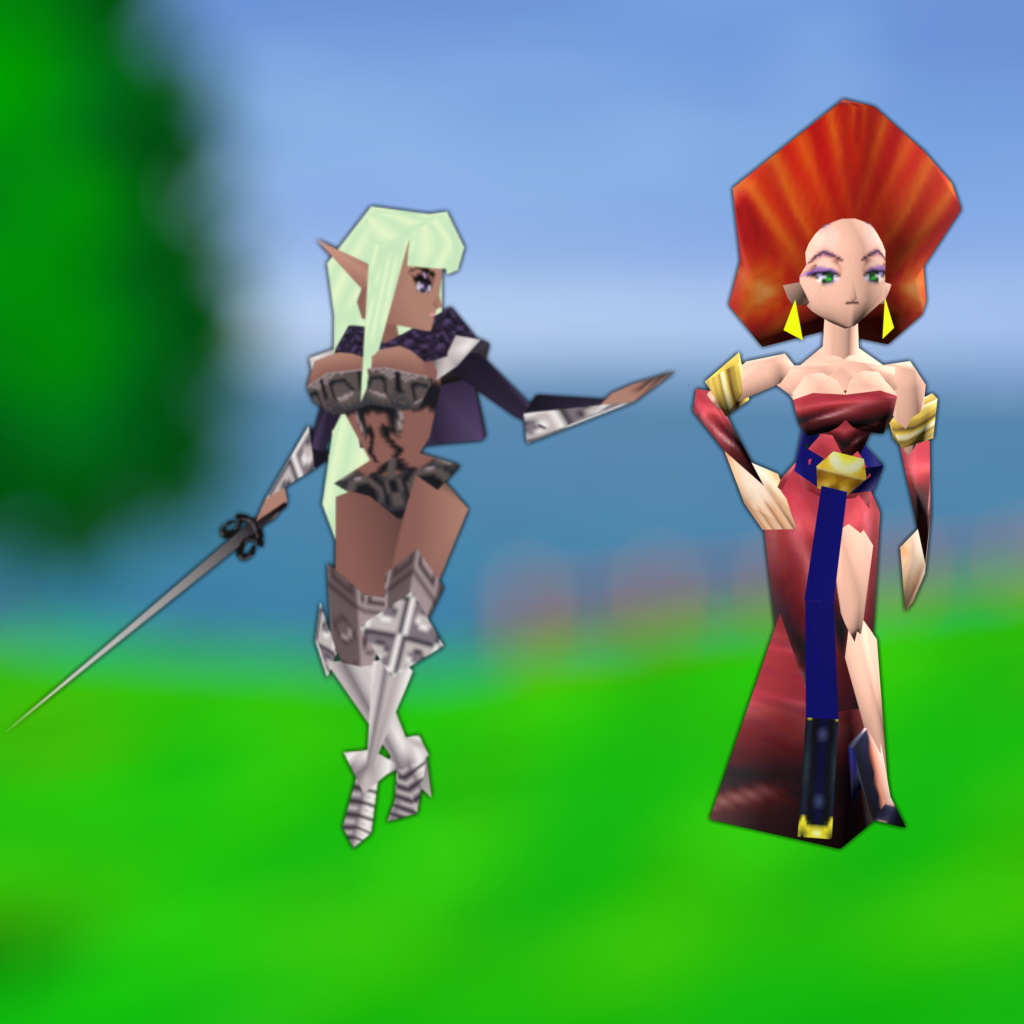
Low poly render of Railanor from Unicorn Overlord in the style of Quest 64.
Last year I finally completed a playthrough of Quest 64, which aligned nicely with my fall down the Blender rabbit hole. I did an early style study of that game's low poly style with my WoL, Astraea, and was quite happy with the results. There's something really fascinating about how economical Quest 64 models are, a collection of primitive shapes aligned and arranged just so to create delightful characters with great silhouettes. It's an excellent art style and one I recommend any low poly modeler spend some time exploring, but my return to it is a bit more seeking comfort in familiarity. January was immensely unkind, and this was very much a project of occupying my mind to not completely fall into the swamps of sadness.
I've had Railanor on the brain recently. She's always been one of my favorites from Unicorn Overlord (which is one of my favorite games from the last couple years), but some recent fan art by Yllande led me to check if her voice lines had been ripped yet. Discovering they had been, I fell into putting together a voice claim edit for Astraea, which may have tickled that Quest 64 fancy. So here we are, Railanor in the style of Quest 64.
Railanor comparison with Shilf from Quest 64.
I'm really quite pleased with how she turned out, particularly in the technical realm. She's 380 triangles all told - for comparison Shilf is 371. I was aiming for under 400, which was tough going for a while there due to the number of elements in Railanor's design: She has long hair, a mantel, a cape, a sword, and of course she has curves (rounding elements devours triangles). I'd originally tried to model some buns to provide the proper Railanor thickness, but those were the first triangles on the chopping block. I ended up finding a number of triangles to harvest while texturing - things that didn't add significant detail or silhouette strength. For a long time, this left her thighs somewhat underbaked, just these 4 sided columns sticking up that seemed awfully thin at specific viewing angles. I was able to find much more interesting shapes without adding any more triangles just by moving the upper vertices of her thighs, breaking the symmetry of those columns and filling in more of the void where legs join her hips.
A lot of the joy of working with N64 style textures is letting the bilinear scaling take the wheel and using your pixels to get a somewhat blurry idea across. The N64 had a whopping 4KB (I doubletake every time I type that KB - surely that should be MB right?) of high speed texture memory for drawing to the screen. The more I look at that figure, the more I wonder how many texture loads were feasible in a frame. Railanor's textures are few and fairly miniscule, but still topping out around 3.1KB file size according to my OS. (Brief aside, I now have a copy of Asesprite, allowing me to create color-indexed pngs, wahey. This also means her entire palette is 32 colors, including transparency.) Let's actually breakdown these 11 textures:
- Hair: 8x8px. Ever since doing an Ocarina of Time style study, I've used a pretty consistent strategy for N64 hair: A simple base color with some broken vertical highlight lines, then stretch the UVs to hide the repeated texture.
- Face: 32x32px. This includes an eye and the mouth, which is mirrored. I could have shaved 8 pixels off the the side of this texture and let the mirroring cover that space, but I tend to stick to power-of-two textures sizes.
- Mantel: 8x8px. Very pleased with how this one worked out. I drew some vaguely feather shaped dark outlines over a base midtone, then some small highlights for depth. Since this is a repeating texture, I worked the edges of the texture specifically to loop nicely.
- Bodice (Bust): 16x16px. This is a mirrored texture and is really only concerned with the cups holding her vertex-colored booba. I wanted specifically only 2 instances of the texture per cup. The band around the back is covered by the next texture.
- Bodice (Core): 16x16px. Also a mirrored texture. One mirrored pair on the front, and one on the back. As mentioned above, this included the band of her top, with UVs carefully placed to hide much of the band on the front while allowing vertical mirroring to provide a full band around the back. Some amount of support for those assets.
- Bodice (Waist): 16x16px. Since her waist geometry is a mostly a diamond, that means we lose out on the corners of this texture. We're again making use of mirroring to wrap from the front around the side, with some sneaky UV adjustments for her butt. Essentially the pattern is ABA around the front-side section, and BAAB across the butt, then BAB to wrap around the side-front.
- Hand: 2x8px. A simple repeated texture of a single finger with a shaded in-between-fingers side (1 of those 2 horizontal pixels). Repeat 3 times to create 4 fingers, maybe a 4th time to allow for a thumb.
- Crossguard: 16x16px. Another mirrored texture, this time with transparency cutout. I'm really pleased with how this looks as part of her sword. Despite the transparency, the crossguard is thin enough that you don't really notice it doubling up, but there is a bit of body that would have been lacking if that geometry had been a single flat plane instead of an "envelope" around base of the blade.
- Boot: 16x16px. This repeats so we get the light-dark-light-dark pattern. Pretty simply texture strategy here.
- Knee Guard: 16x16px. This one I'm real proud of. You'll notice this texture list has been roughly from head to toe, but I skipped over the metal textures of her pauldrons and bracers. That's because they both use this texture. While this is a bit more obvious with her bracers, shrinking the UVs of the pauldrons allows us to get some nice blurry N64 metal. Thanks bilinear scaling! I also used this trick for the metal of her greaves.
- Feet: 8x4px. Making use of repeating textures much like how we do finger segments for the hands, but now we have these metal panels repeated for her sollerets. Stetching the texture horizontally gives us a bit more of that N64 metal look, and ensuring our UVs wrap to the dark section around the back provide a nice implied shadow around the ankle.
Anything not covered in that list is making proper use of vertex colors, which I'd say is fun except I don't love that interface in Blender. Vertex colors being done brings me joy, it's just a bit of a nuisance to get there.
I kept Railanor's rig pretty simple (actually a little too simple). In reviewing footage of Shilf, I couldn't quite tell if her hands or feet move independently of her wrists or shins, so I didn't add those extremities to the skeleton. I'd originally planned not to add hair bones, but the need for them became apparent immediately when I started posing. There's also a bunch of cape bones since Brian's cape is obviously animated in game. The real kicker is that despite intending to animate Railanor's very hip-sway-heavy idle, I originally didn't bother to setup inverse kinematics. At first I thought I'd get away with just a plain skeleton, and for a bit I was keeping her feet relatively planted. Then I added the forward and back hip sway and wasted a stupid amount of time trying to fix the floaty leg and feet movement. Eventually I just went back to add some basic IK and re-keyed where her feet should be - 15 minutes compared to the hour and more I wasted prior.
Geometry breakdown for Shannon from Quest 64.
And that brings up time: I spent about 16 hours on this model. Roughly the first half of that went into modeling, including investigating and breaking down some Quest 64 character models. The second half went to texturing, rigging, skinning, and animating. I'm not thrilled with 16 hours - that feels too slow by a significant degree (even if you take back the hour I should have just setup IK). I'm not sure how long it should take me to do these things, and I don't know what time I'd be happy with. I just feel like I work too slowly, particularly in the modeling phase. (A lot of this "do it faster" feeling comes from my brain doing "if I were getting paid for it" math - is this model really worth 16 hours times "what should I even get paid hourly for this?")
That really about sums it all up. I'm happy with the results, I just want to be able to get these results faster. Every model being a multiple day affair is a bit draining, and the art pricing math fallout from that does not inspire confidence that I'll ever land a commission at a price anyone wants to pay.